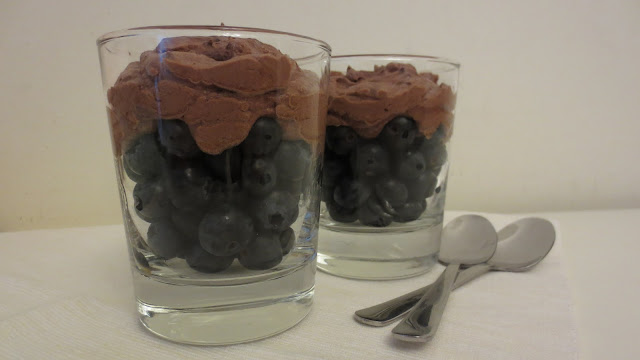
Few weeks ago I prepared a cosy romantic dinner at home - fresh baguette with herb butter to start and beef with crispy potatoes as a main course. And for dessert I prepared these lovely mousse pots. I had quite a few ideas for dessert but because I wanted something that I could make in advance and that would not be too heavy, because as we were quite full already after finishing the first two courses, having a heavy dessert would have been out of the question.
This is the second time I've made these mousse pots - first time was for a dinner I made for my sister - and I have to say that if I'd have to entertain a bit bigger crowd that just two persons I would seriously consider serving this. It's quick and very straightforward to make, doesn't require baking, isn't too heavy, can be made in advance, has nice berries in it (you can mix different berries) and on top of everything it contains chocolate! And trust me, after tasting home-made chocolate mousse you'll never ever reach for the stuff they sell in shops.
All in all, it is light and fluffy, but at the same time gives you the melt-in-your-mouth feeling and satisfies both the people who try to keep their eating healthy as well as those devoted chocoholics who don't consider anything a proper dessert unless it contains chocolate. I'd like to point out that even though the recipe calls for dark chocolate, it does not taste bitter at all (and has all the antioxidants!) and in my honest opinion it would be a bit too sweet if made with milk chocolate instead.
Ingredients
(Serves 4 - approximately 160 cal per serving)
- 75g dark chocolate, melted
- 4 tbsp low-fat yogurt
- 2 large egg whites
- 2 tsp caster sugar
- 350g blueberries (or other berries or even a mix of different berries)
Directions
Firstly melt the chocolate and set it aside to cool for 5-10 minutes. Once it has cooled down, mix in the yogurt. Then wash and dry the berries and place in small glasses or ramekins.
Whisk the egg whites until they are stiff, then add sugar and beast until sugar is dissolved and the egg white has turned into stiff glossy peaks. Fold the egg whites into the chocolate mixture - firstly loosen the mixture with a spoonful of egg white and then carefully fold in the rest of the mixture, trying to keep as much air in as possible.
Finally, divide the chocolate mousse between the ramekins and chill in the fridge until set (or until serving). Enjoy!
Recipe from BBC Good Food
25 March 2013
17 March 2013
Pepper & Feta parcels
I made those filled peppers for a BBQ we had yesterday. This was the first time I tried something different from a fresh salad to accompany the meat and I have to say that although the prepping to a bit longer than the usual tomato-cucumber-lettuce salad the result was really worth the extra effort. Although I know BBQs tend to always be about meat (and lots of it) I think it is equally important to offer something nice to go with all the meat that tastes nice both with meat and without it (this is really important if you have vegetarian friends).
After flicking through all the recipes I have under side dishes I came down to either this one or a more simple feta and tomato parcels. I know this will sound a bit too simplistic but I picked this one because it looked a lot more colourful than the other one - and they say that it is important to keep you vegetables colourful in order to get all the necessary vitamins. And to be fair, something nice and colourful looks really nice next to some BBQ meat.
All in all, these take around 15 minutes to prepare, but they are so worth the effort. I received compliments for those parcels from both my vegetarian friend as well as the meat eaters, so they must be good. So next time when you have a BBQ (or for the very first BBQ of the season which I know are coming up as soon as the snow melts and temperature becomes bearable) instead of serving a fresh green salad surprise your guests with those delicious vitamin filled parcels - trust me, they'll be a big hit with all the guests and you might even have to share the recipe afterwards :)
Ingredients
(Serves 8 - approximately 142 cal per serving)
- 1/2 red onion
- 4 baby courgettes, halved and sliced
- 16 cherry tomatoes, halved
- 16 black olives
- 2 tbsp shredded basil
- Olive oil
- 4 red peppers, halved and seeds removed
- Salt
- Pepper
Directions
In a bowl, mix the chopped onion, courgette, tomatoes and olives. Crumble over the feta and add the basil. Drizzle with olive oil and season with salt and pepper.
Divide the filling up between pepper halves. Cook them on a barbecue or in a hot oven until the vegetables are tender.
Recipe from BBC Goodfood
After flicking through all the recipes I have under side dishes I came down to either this one or a more simple feta and tomato parcels. I know this will sound a bit too simplistic but I picked this one because it looked a lot more colourful than the other one - and they say that it is important to keep you vegetables colourful in order to get all the necessary vitamins. And to be fair, something nice and colourful looks really nice next to some BBQ meat.
All in all, these take around 15 minutes to prepare, but they are so worth the effort. I received compliments for those parcels from both my vegetarian friend as well as the meat eaters, so they must be good. So next time when you have a BBQ (or for the very first BBQ of the season which I know are coming up as soon as the snow melts and temperature becomes bearable) instead of serving a fresh green salad surprise your guests with those delicious vitamin filled parcels - trust me, they'll be a big hit with all the guests and you might even have to share the recipe afterwards :)
(Serves 8 - approximately 142 cal per serving)
- 1/2 red onion
- 4 baby courgettes, halved and sliced
- 16 cherry tomatoes, halved
- 16 black olives
- 2 tbsp shredded basil
- Olive oil
- 4 red peppers, halved and seeds removed
- Salt
- Pepper
Directions
In a bowl, mix the chopped onion, courgette, tomatoes and olives. Crumble over the feta and add the basil. Drizzle with olive oil and season with salt and pepper.
Divide the filling up between pepper halves. Cook them on a barbecue or in a hot oven until the vegetables are tender.
Recipe from BBC Goodfood
Labels:
barbecue,
cheese,
side dish,
vegetarian
10 March 2013
Raspberry yogurt muffins
I realised today that I haven't had muffins for breakfast in ages and as we were slept without an alarm this Sunday, a plan to have muffins for brunch sounded perfect. Warm, just out of the oven homemade muffins make an amazing breakfast (or brunch) and they are so quick and easy to make. In addition, muffins come in all tastes and sizes so there's bound to be something that fits your taste.
I've made these muffins quite a few times before, but that was during my pre-blog era. They are incredibly light and moist and have this melt in your mouth feeling. Even my friends who don't have a sweet tooth love them as they are so well balanced between sweet and sour. I love the addition of yogurt in these muffins as it creates the lightness and not the soaked in oil feeling you get with store bought ones.
So, if you're in search for that perfect breakfast muffin that is quick and easy to make and also doesn't end up in you consuming your daily calorie intake during breakfast then this is the way to go. They also keep well for few days (the maximum mine have stayed have been 2 days as usually they are all gone during the day I made them). Have them for breakfast, serve them as a dessert or make them for a picnic - one really nice and universal muffin recipe.
Ingredients
(Makes 12 - approx 160 cal per muffin)
- 50g butter, melted
- 2 dl sugar
- 2 eggs
- 1.5 dl natural yogurt (fat free)
- 3 dl flour
- 1.5 tsp baking powder
- 2 dl raspberries
Directions
Firstly melt the butter and set it aside to cool. Line a 12-hole muffin pan with muffin cups and preheat the oven to 200C. Then whisk the eggs and sugar. Add natural yogurt, melted butter, flour and baking powder and mix well. Divide the batter up between the holes and press 3-4 raspberries into each muffin cup. Bake for 15-17 minutes.
Recipe from a book called "Muffinid 2"
6 March 2013
Chicken & peach salad
As you know it was my birthday last week and therefore I had a small get together with some of my closest friends. It was a really nice cosy girls' night in and to be hones, very few things trump the combination of great company, great wine and great food. My friends have known for a quite some time that I really enjoy cooking and I received three really nice cookbooks from them (I might have dropped a hit ;) ) and as with all new things I was eager to try them out! So, instead of telling myself that I'll do the next dish from one of the books, I just noted down the ingredients and decided to make a delicious salad for dinner tonight.
I have to say I've always been very sceptical about salad dressings and whenever I read a salad recipe which contains mayonnaise I get the feeling that I'd be better off eating something else as this salad won't be as healthy as salads should be. However, as I was in a bit of a rush today I didn't have time to weigh the pros and cons of this salad and as it looked appetising enough on the picture I just decided to give it a go. In hindsight, I'm very happy that I did so, because the result was delicious. And for all those of you who try to watch what you eat, which I'm trying to do now as well, because I need to look good for the wedding (even though it's like 2,5 years away), there is no need to worry. At first the amount of mayo might seem like a lot, but if you divide it between the portion sizes it is not that frightening anymore. I'm obviously not telling you that you should soak your salads in mayo from now on, but just talking from my own positive experience, having a homemade dressing with some mayo in it won't kill you and it actually tastes really nice when mixed together with natural yogurt.
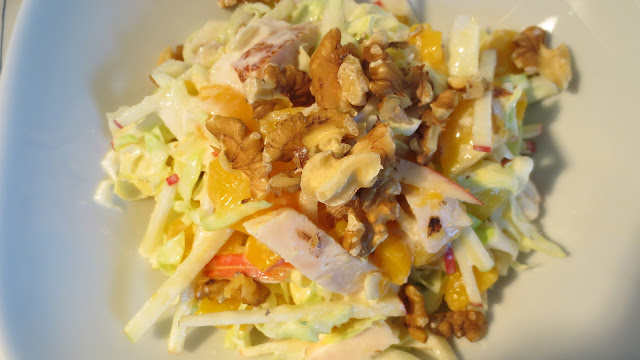
So, a little bit about the salad. I absolutely love this dressing it goes really well with the other ingredients. This is a very tasty, fresh and summery (and light!) salad which could be served as a starter or a side dish at a BBQ or just enjoyed on its own for light lunch or dinner. I know that where I am right now it is summer all year long, but when I lived back in Europe the beginning of March already started to create a spring feeling and thinking of all of you who live in the northern hempisphere this salad is great for helping you to get into the spring mood, brighten up your day and make you look forward to those warm summer evenings in the garden with goods friends and food.
Ingredients
(Serves 4 - approx 370 cal per serving)
- 1 roast chicken leg (thigh and drumstick) or use 200g chicken breast roast ham instead
- 825g canned peach
- 1 large apple
- 1 small green cabbage
- 50g walnuts
Dressing:
- 2 dl fat free natural yogurt
- 1 dl light mayonnaise
- 1 tsp salt
- 1 tsp sugar
- 1/2 tsp ground ginger
- Some pepper
Directions
Chop up the chicken into small pieces and place in a bowl. Cut the peaches into cubes and add to the chicken. Then slice the apple and cabbage into thin strips and add to the bowl. You can either mix the ingredients or keep them layered (would look nice in a see-through glass bowl). Then prepare the dressing by mixing all the ingredients together and pour it over the salad. Top it off with crushed walnuts and enjoy!
Recipe from "100 Linnuliharooga" (100 Rooga)
3 March 2013
Salmon canapés
I went to visit my parents in Estonia last week and as it is my birthday today, I also had a small sit down with my friends and a late lunch with my grandmothers. Part of me is already fed up with cakes - I made three cakes in three days and they were all gone by the time I left for my flight. But instead of a cake recipe I'll share a quick and easy nibbles recipe.
Made those salmon canapé snacks to have before indulging in the various different cakes and they really went down as a treat - everyone loved them. Serving salmon on a rye crisp bread instead of the more traditional blinis ups the health rating of the recipe in addition to adding a nice twist to it. These small squares are incredibly quick and easy to make - just make sure that you don't make them ages in advance as the cream cheese will soften the rye crisp bread and the snack is not so crispy anymore.
Feel free to experiment with seasoned cheese spreads and server with a squeeze of lemon. Also, for a more sophisticated take decorate some squares with baby capers. All in all - a quick, tasty and easy party canapé, which in addition to its deliciousness also counts towards your Omega 3 intake.
Ingredients
(Makes 24)
- 175g smoked salmon
- 8 Finncrips rye crisp breads, cut into 3
- 150g cheese spread (or cream cheese)
- Dill, to decorate
Directions
Cut the rye crisp breads into three equal size pieces and top each off with a generous amount of cheese spread. Then cut up the salmon and place on top of the cheese. Place the canapés on a plate and sprinkle with dill.
Subscribe to:
Posts (Atom)