Showing posts with label fish. Show all posts

23 April 2014

Sea bass with ginger, garlic & chilli

With the summer fast approaching I've slowly started moving away from eating soups for dinner and looking for lighter and fresher options. To me white fish has always been a kind of summery food as it's really light and I can't honestly imagine eating white fish as a comfort food during a cold winter evening. Unless of course, when it's inside a fish pie, but then it is a totally different story.

Another great perk of cooking white fish is that it is so quick to make. It took me longer to chop up the ginger, garlic, chilli and the spring onions than to fry the fish. And if you're short of time and what to have a decisions dinner on the table in 10 minutes then white fish is a perfect way to go.

I really love sea bass and I have to say that it's probably my favourite white fish. It's really easy to pair with everything and I've fried and steamed it and it has come out great whichever way I've decided to prepare it.

I came across this recipe when I was looking through BBC Good Food website again, and it really stood out because of its simplicity. Don't get me wrong, I love trying out new and different things and testing ingredients I haven't used before. But sometimes it's quite nice to just do something really simple and fuss free, which also means that there was no need for me to go out and buy a whole load of new ingredients that would just take up cupboard space, or even worse - would go off before I had a chance to use them up.

I love how the flavours and different textures work together in this recipe. And I have to admit that the Asian twist really took me back to my Singapore times and made me feel slightly nostalgic. The fish was lovely and crispy on the outside, but oh so tender and juicy on the inside. The chilli added the extra bit of spiciness, as did the crispy garlic, and the ginger just added that extra layer of flavour.

Quick, light, tasty and incredibly fuss free to make - harder to find a more suitable mid-week dinner recipe. Serve with some rice or enjoy on its own.

Ingredients

(Serves 1)
- 1 sea bass fillet, skin on
- 1 tsp sunflower oil
- Small piece of ginger, peeled and cut into matchsticks
- 1/2 garlic clove, thinly sliced
- 1/2 red chilli, deseeded and thinly sliced
- Spring onion, to serve
- Salt, pepper, to season
- 1 tsp soy sauce

Directions
Pat the fish dry, slash the skin 3 times and season the fish with salt and pepper. Heat the sunflower oil in a frying pan and add the fish skin side down once its hot. Fry for 5 minutes or so until the skin is crisp and golden and then turn over and try for another minute or so and then transfer the fish to a plate. Add the ginger, garlic and chillies and fry them for about 2 minutes until golden and crispy. Pour the soy sauce over the fish, spoon the ginger, garlic and chillies on top of it and garnish with spring onions. Serve immediately and enjoy!

Recipe from bbcgoodfood.com


12 February 2014

Salmon & poached egg on rye bread

Up to that morning I had never poached an egg in my life. It always seemed like too much of a hassle and reading all the comments online regarding how difficult it is to do it properly I just never got the courage to give it a shot. However, as I am a huge fan of having smoked salmon with scrambled eggs on a slice of toast I finally decided to give poaching a try - it's basically the same thing, just looks a lot fancier.

It goes without saying that I did quite a bit of research into how to poach an egg and it was surprising how many different - and conflicting - options were out there. Put salt, don't put salt, add vinegar, no need to add vinegar etc. So when it came down to making the decision which one to follow I decided to go with Gordon Ramsay's version that I found on BBC Good Food and purely for the reason that every other recipe by him that I've tried has come out amazing. And I can now report back that the poached egg was a success as well!

I rarely eat eggs during the week and consider them to be kind of a treat for breakfast as I am great believer that every bite should be savoured, not just swallowed down as quickly as possible. So it is quite nice every now and then to take the extra 20 minutes to prepare something nice and tasty and then enjoy eating it as well. I love how the rye bread provides substance, salmon the richness the poached egg adds just the right amount of creaminess. It's definitely a treat that I'll make for myself again!

Ingredients
(Serves 1)
- 25g smoked salmon
- Slice of rye bread (or any other bread)
- 1 egg
- Pepper, to serve
- 1l water
- 1 tbsp white wine vinegar
- Butter

Directions
Firstly, place the water in a saucepan, add the vinegar and bring to simmer over medium heat. Then, use a spoon to create a vortex and drop in the egg, this way the egg white will automatically curl around the yolk and leave it in for 3 minutes if you like your yolk creamy (for less if you like it very runny and for longer if you prefer it more solid). In the meantime prepare the salmon sandwich - rye bread, butter and salmon - and place on a plate. When the egg is done, take it out with a slotted spoon and dry with a peace of kitchen towel, making sure you don't pat too hard (don't want to brake it). Place the egg on top of the sandwich and serve immediately with some freshly ground pepper. Enjoy!


4 November 2013

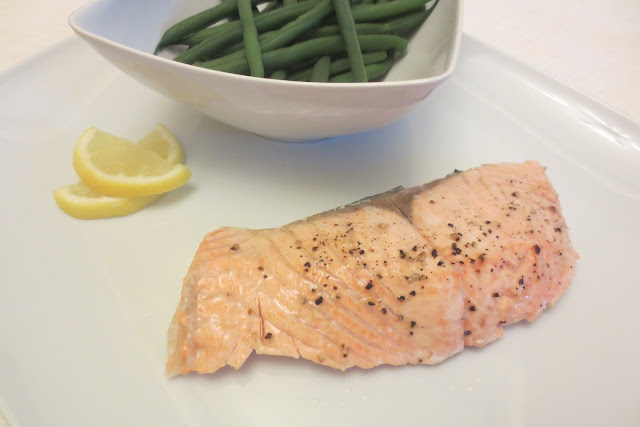
Salmon with celeriac gratin & green beans

I am a huge fan of salmon and want to constantly incorporate more of it into my menu. So, whenever I see an interesting recipe with it I want to try it out as quickly as possible. When I flicked through my October copy of BBC Good Food magazine and saw this recipe I marked the page immediately. But as usual, it took me quite some time to get around to making it, but I can proudly say that I've made it twice already (once without the gratin) and fell further in love with the way this tastes like.

I have to admit that I'm not that keen on the celeriac gratin, but I think that the fact that this was the first time I've had celeriac in such a form might have had something to do with my opinion of it. Or maybe it's because I'm very used to eating potatoes with my salmon that I just found it slightly out of place. Nevertheless, the taste was interesting and I would definitely give it another shot when I'll make it again.

Salmon with the whole-grain mustard coating is a totally different story! I fell in love with it. I love the way the mustard adds so much flavour to the salmon and balances out its richness. Here I have to take a second and thank this blog as it is the sole reason I now eat mustard - all thanks to the honey-mustard chicken that I made to push myself further in trying to find new recipes to post. The second time I made it I used a whole chunk of salmon, rather than individual fillets, and my dad who usually doesn't eat salmon at all helped himself to a second portion!

If you leave aside the celeriac gratin, this dish is very easy and quick to cook and requires very little preparation. And even if you make it with the gratin, one of the beauties of it is the fact that you put it in the oven for 1 hour and 15 minutes and then can do other things in the meantime. So, if you want to try out an amazing new way of cooking salmon and want something tasty, filling and warming, this is definitely something to try.

Ingredients

(Serves 2)
- 400g celeriac, peeled
- 5 garlic cloves
- 1/2 chicken stock cube
- Fresh thyme
- Grated nutmeg
- 2 salmon fillets
- 1 tsp wholegrain mustard
- 250g green beans

Directions
Heat the oven to 180C fan/200C. Slice the celeriac as thinly as you can and find a baking dish that would fit all of it in. Add a layer of celeriac, sprinkle with garlic, thyme and seasoning and repeat the layers finishing on a celeriac layer. Mix the stock cube with 230ml of boiling water, season with nutmeg and pour over the celeriac. Bake in the oven for about 1 hour and 15 minutes.

When the gratin has 15 minutes to go, place the salmon on a baking sheet, cover with mustard (add some salt and pepper if you wish - I find that mustard on it's own is enough) and bake for 12-15 minutes.

Meanwhile, boil the green beans. When everything is ready, arrange on a plate and enjoy!

Recipe from BBC Good Food magazine October 2013

8 July 2013

Simple sesame-seared tuna

As you can see I'm really taking my task of making the most of the fresh fish here quite seriously - last week I made a salmon tartare and now I made myself this super-quick tuna dish for lunch. I really love sushi and sashimi, but sometimes when I eat sashimi I feel like there's something missing. The fish itself has always been delicious, but sometimes I just crave for something a bit more than plain fish. And as the local fish and sushi shop does not do sesame seared tuna I had to get myself together and make it at home.

I was pleasantly surprised to find out how easy it was to put together such a lovely dish - it's just a matter of minutes! The asparagus takes the longest to prepare, but if you have your tuna without a side, then it'll be ready in just over a minute. Apart from the speed I really loved the taste and texture. I know that the middle is still raw (that's why you need sushi grade tuna), but the seared edges really make a difference. This was the first time I prepared something out of tuna steak and I was really pleased with myself. So no more excused for not cooking at home - it is possible to have a healthy, filling and satisfying meal ready in no time.

This works well as a starter or light lunch or dinner and on top of that, it is fancy enough to be served at a dinner party. And if you've got a bit more time and prefer slightly nuttier taste, roast your sesame seeds until they're golden brown before rolling the tuna in them.

Ingredients

(Serves 1)
- 110g sushi grade tuna steak
- 90g baby asparagus
- 2 tbsp sesame seeds
- 5 tbsp soya sauce


Directions
First stir-fry the asparagus with a dash of soya sauce and set on a plate. Then sear the tuna steak by doing each side for 12-15 seconds and then roll it in the sesame seeds. Slice the tuna up and place it on the asparagus. Serve with soya sauce.


23 June 2013

Salmon & Avocado tartare

I've become aware of the fact that my time in Singapore is limited (I'm moving back home mid-September) and as my recent visit to London reminded me of the expensive sushi grade salmon prices I decided that it was my last chance to get myself together and actually give making a homemade salmon tartare a go.

I absolutely love tartares - salmon, tuna or a mixture of both and I frequently have them whenever I'm eating out. So, having my hopes up high I did some research on the internet and to my great disappointment I did not find the recipe that I was looking for. Well, to be honest I didn't know what I was looking for exactly, but whatever I found just didn't feel right. Don't get me wrong - the recipes and pictures looked divine, but they were just not was I was looking for. So I had no other choice than to improvise... and it turned out so well that I'm actually thinking of giving tuna tartare a shot as well!

Because I've had quite a few tartares I kind of knew what I wanted mine to have. Also, I was sure about the things that I didn't want my tartare to include - onions and no mayo based dressing, as I wanted to keep it healthy. I love the taste cooked onions give to soups, fry-ups and roasts, but I just don't like raw onions. I never have and the chances are that I'll never will - I even make all my fresh salads without raw onions. But that's just my thing. If you love onions then by all means add some to the tartare. So after deciding on the ingredients and actually buying them it was time to mix it all together. I was aiming for a light, but at the same time creamy, and flavourful tartare. The resulting tartare was exactly what I had wanted for - simple, creamy and with a nice oriental touch. I served my tartare with some cracker bread, but it would also go well with toasted baguette or even Indonesian krupuk.

Also, apart from being really delicious and filling, both avocado and salmon are two of super-foods - so in addition to having a filling meal you're also doing your body a whole lot of good.

Ingredients

(Serves 1)
- 1 Ripe avocado
- 140g sashimi grade salmon fillet, skin removed
- Juice of 1/4 lemon (plus zest to serve)
- 2 tsp sesame seeds
- 3-4 tsp soya sauce
- Small piece of root ginger, crushed
- 1/2 tsp fish sauce
- Crackers, to serve
- Dried coriander, to season
- Pepper, to season

Directions
First halve the avocado, remove the seed and peel both sides. Then smash one side up with a for and add lemon juice, 1-2 tsp soya sauce (it all depends on how salty you like your food), fish sauce and crushed ginger. Mix well and set aside.

Then cube the other half of avocado and salmon and place them in another bowl. Add the remaining soya sauce, 1tsp sesame seeds, some fresh pepper and a pinch of dried coriander. Mix well.

Mix the avocado puree together with the salmon. Place a piece of clingfilm in a bowl, then place the tartare in firmly in the bowl. Keep in the fridge until serving.

To serve the tartare, remove it from the bowl - this is where the cling film comes in handy. Sprinkle it with some sesame seeds and serve with crackers or toasted bread. Enjoy!


11 April 2013

Thai style salmon burger with rice

I'm trying to keep to my promise of having Asian influenced food and obviously sharing the results with you. I really wanted to have salmon today and wanted to try something different from the usual steamed salmon. Also, as I am nearly done with my masters and just have a week to go I wanted to make sure that he food will keep me full for quite a few hours so I could concentrate on revision without having to think about food. After a quick search on the internet I finally got an idea - salmon burger. That ticks both of the boxes - salmon with a nice Asian twist.

I have to be honest with you here and confess I've never made nor tried a fish burger so this was something totally new for me. The closest I've come to having a it has been eating fish fingers and to be fair, that's pretty far away. So, I looked through recipes and eliminated the ones which required too many ingredients and which took long time to make. After finding the perfect salmon burger recipe I decided to have it with brown rice and a raw veggie salad and voila - healthy and incredibly filling dish!

I really love the taste of this burger - the ginger and red curry paste add a really nice zing to it. Cooling cucumber and silver sprouts balance out the spiciness and brown rice keeps you full nice and long (feel free to have jasmine rice or some noodles if you wish so). So, all in all - a really nice and very flavourful (maybe even a bit too spicy for some - but I can't objectively describe the spiciness as my tolerance levels have risen considerably after moving to Singapore) dish that is relatively quick to make. The burger itself took less than 10 minutes, but my brown rice took almost 50 to make, so the speed really depends on with what you're having your burger with.

Ingredients

(Serves 1)
- 150g salmon fillet, no skin
- Fresh coriander
- 1/2 tsp soya sauce
- 1 tsp red curry paste
- Root ginger
- 48g brown rice (or other rice or noodles)
- 40g silver sprouts
- 20g carrots
- 30g cucumber
- Lemon, to serve
- Olive oil, for cooking

Directions
Firstly prepare the rice and when there's just 15 minutes left until it's ready, start preparing the fishcake and salad.

For the salad, use a vegetable peeler to make thin carrot and cucumber strips and mix them together with silver sprouts and place on the plate.

To make the burger place the salmon, a small bunch of coriander, soya sauce, curry paste and a tiny bit of ginger (depending on how gingery you like your food) into a food processor and pulse until roughly minced. Heat some olive oil in a pan, make the salmon mixture into a nice burger and fry on both sides for 4-5 minutes until cooked and nicely crispy on the outside.

Place the rice and salmon burger on the plate, decorate with some coriander and a lemon wedge and serve immediately.

Fishcake recipe from BBC Good Food


3 March 2013

Salmon canapés

I went to visit my parents in Estonia last week and as it is my birthday today, I also had a small sit down with my friends and a late lunch with my grandmothers. Part of me is already fed up with cakes - I made three cakes in three days and they were all gone by the time I left for my flight. But instead of a cake recipe I'll share a quick and easy nibbles recipe.

Made those salmon canapé snacks to have before indulging in the various different cakes and they really went down as a treat - everyone loved them. Serving salmon on a rye crisp bread instead of the more traditional blinis ups the health rating of the recipe in addition to adding a nice twist to it. These small squares are incredibly quick and easy to make - just make sure that you don't make them ages in advance as the cream cheese will soften the rye crisp bread and the snack is not so crispy anymore.

Feel free to experiment with seasoned cheese spreads and server with a squeeze of lemon. Also, for a more sophisticated take decorate some squares with baby capers. All in all - a quick, tasty and easy party canapé, which in addition to its deliciousness also counts towards your Omega 3 intake.

Ingredients
(Makes 24)
- 175g smoked salmon
- 8 Finncrips rye crisp breads, cut into 3
- 150g cheese spread (or cream cheese)
- Dill, to decorate

Directions
Cut the rye crisp breads into three equal size pieces and top each off with a generous amount of cheese spread. Then cut up the salmon and place on top of the cheese. Place the canapés on a plate and sprinkle with dill.


29 January 2013

Simple tuna & pasta salad

Before turning to today's post, I'd like to let you know that I've added a new smoothie recipe (check them all out here). As most of you know I've been spending a considerable amount of my time at university over the past two weeks (just one more week of intensive course to go!) and I have to admit that I'm not the biggest fan of the food available there. So, I've just resorted to bringing my own lunch and/or dinner with me. I know it adds to the weight of my bag, but it's really worth it.

I've pretty much exhausted my appetite for the plain green salads that I made for myself the last term and therefore I've had to resort to coming up with some new ideas. Whilst I was doing some food shopping last week, I stopped in the pasta aisle and had a look at what there was - I've never realised that the choice of different pasta (different shapes, sizes and ingredients) is so big. And as I was already going to try out a new recipe I decided to try out a new pasta at the same time - two birds with one stone. I made the salad with rice and millet pasta and to be honest, the only real difference I could tell was that this one was a tiny bit sweeter than the 'normal' pasta (but let's be honest, nothing beats the 'normal' pasta). There is no big difference between the nutritional values of the two but the rice and millet pasta is supposed to be easier to digest and also can be eaten by people with different food sensitivities and allergies (it is vegan, gluten free etc). I wouldn't say I would from now on just eat that, but I would seriously consider incorporating it into my diet if I want to be a bit nicer to my digestive system.

Anyway, enough about the pasta itself - turning to the salad. It is incredibly easy to make and you can add anything you wish (e.g. sweetcorn and tomatoes) to your salad. This combination gives you a nice base to have it on its own or to improvise further with. If you're not a big fan of capers, by all means leave them out. But I really recommend at least giving a try because I find that capers add a really nice touch to the salad, making it taste a bit more interesting than just pasta and tuna would. This is perfect for packed lunch (that's what I've been doing with it), easy to make and will keep you full for quite a few hours.


Ingredients
(Serves 2 - approx 400 cal per serving)
- 125g pasta, boiled
- 1.5 cans of tuna (in water)
- 3 tsp capers
- 60g iceberg lettuce
- 1 tbsp olive oil

Directions
Boil and drain the pasta and leave to cool down. When the pasta has cooled down, mix together all the ingredients and serve (or place in a box and keep in the fridge until serving).


5 December 2012

Salmon with quinoa & butternut squash

Generally, when people talk about healthy food, the first thing that crosses their minds is something green and without any taste. But healthy does not always have to equate with not tasty or not filling. As you already know I am a huge fan of salmon and ever since I found the place to buy fresh salmon here in Singapore, I've been having it once or twice a week. Salmon, in my opinion, is one of those healthy foods that tastes absolutely divine and with all those good Omega-3 fats it should find its way to our plates more often. Also, I have rediscovered quinoa. I had this super-food when I did a weeklong detox with my best friends during spring and hadn't made it ever since, but I am sure that from now on it will be a regular in my menu - be it as a side dish or a salad base. This small seed is high in protein, calcium, iron, dietary fibre and it works great as a substitute for rice. With all these super-foods I decided to add some vegetable to finish the dish off. And the result? Incredibly filling, tasty and healthy meal that will keep you full for a long time. And the bonus is that it is nice and hot so its perfect for those dark cold winter nights when you want something warm and hearty.

Ingredients
(Serves 1)
- 40g quinoa
- 125-150 ml water
- 150g salmon
- 200g butternut squash
- 1 tsp mixed herbs
- Salt
- 1/2 tbsp olive oil
- Lemon, to serve

Directions
First, preheat the oven to 200C. Then soak the quinoa for about 5 minutes and then rinse. While the quinoa is soaking, prepare the butternut squash. Peel the squash, chop it into small cubes and place in a bowl. Sprinkle with olive oil, herbs and some salt and mix well. Place into an ovenproof dish and bake for around 20-25 minutes.

To prepare the quinoa, bring the water to boil in a small pan and add the quinoa. Boil for around 15-20 minutes until soft. Make sure it doesn't burn and if necessary add some more water (cooking a small quantity is a bit trickier than large quantity of quinoa).

Start preparing the salmon when you've got 10-12 minutes left until quinoa and squash are ready. Pour hot water in the pot, insert a steamer and place the salmon on top (skin down). Sprinkle with some salt and pepper and steam for around 10-12 minutes.

To serve, place the quinoa, butternut squash and salmon on a plate, decorate with some herbs and a slice of lemon.


16 November 2012

Simple steamed salmon

I love trying out new recipes and over time I've gotten the courage to try out some where the list of ingredients is hundreds of meters long and which take ages to cook. To be fair, there haven't been many occasions like that as I prefer to have my meal on the table quite quickly, especially when coming home  hungry after university or when I don't have time to spare to spend in the kitchen because the courseworks need writing and revision needs doing. Despite all the time constraints I have been very careful not to go down to the take-away places or just grabbing something to eat on the go and so far I've succeeded.

Although this recipe is not some sort of culinary masterpiece and does not involve lot of skill nor lot of ingredients for that matter, steamed salmon makes perfect mid-week meal. It's quick and dead easy to make and on top of that it is healthy and filling as well. In addition, steamed salmon makes a perfect base for a more sophisticated meal and it can be served with absolutely anything, starting from vegetables to mashed potatoes to rice, quinoa or just simple leafy salad. And because it is so universal I thought of sharing it with you. If you fancy dress it up with a nice horseradich-crème fraîche sauce or just serve it with some natural yogurt or sour cream or do what most people do - just serve it with a squeeze of lemon. I assure you that no matter what you serve it with or how you serve it the result will always be amazing - a quick, juicy, filling and healthy meal. Bon appétit!


Ingredients
(Serves 1)
- 150g salmon
- 150g French beans
- Salt
- Pepper

Directions
Bring water to boil, place the steamer in the pot and lay the salmon there skin side down. Sprinkle with salt and pepper and steam for 10-12 minutes until ready. To prepare the beans (or any other vegetable of your choice) boil or steam them until ready. Serve immediately.


10 November 2012

Steamed wild snapper & cabbage

I just realised that instead of being a food blog with a good selection of different meals (and emphasis on the healthy note, of course), my blog has basically turned into a baking blog. Fortunately, it is not too late to fix this and from now on I will try to emphasise the main courses and salads and soups a lot more than I do baking (or I'll at least try to balance them out). So, after so many cakes and muffins, I decided to get myself together and start preparing healthy meals again. I've already made a quite impressive list of all the meals I will prepare so I'm sure that I won't get off the track this time (but no need to worry - I'll still post something sweet every once in a while).

And on that healthy note the first dish in this pursuit for more healthy food is the steamed wild snapper with cabbage. Ever since trying out steaming I've loved it. It is healthy and incredibly quick way to cook things. However, up until now I've only steamed vegetables and mainly salmon and thus I decided to try out some other fish. I was a bit sceptical at first as this recipe seemed too simple to be good, but it came out delicious. The tender fish with the crispy garlic bits and little chilli result in a very tastebud tingling combination - even my other half said it was amazing. Therefore it must be good and it's not just me going that it tastes great, for a healthy dish. Takes just 15minutes to make and you end up with a healthy, filling and incredibly flavourful meal.

Ingredients
(Serves 2)
- 2 wild snapper (or other white fish) fillets
- 1 tsp grated fresh root ginger
- 300g green cabbages, finely shredded
- 2 tsp sunflower oil
- 1 tsp sesame oil
- 1 tsp chopped chillies
- 2 tsp soy sauce

Directions
Shred the cabbage and place on a steamer and steam for 5 minutes. In the meanwhile prepare the fish by sprinkling it with chopped chilli, ginger and a bit of salt. Place on top of the cabbage and steam for 5 further minutes until cooked through.

Meanwhile, slice the garlic thinly and heat the oils in a small pan. Add the garlic and cook stirring until the garlic is lightly browned.

To serve, transfer the cabbage to serving plates, place the fish on top of it and top each fish off with 1 teaspoon of soy sauce and the garlicky oil. Serve immediately.

Recipe from BBC Good Food


16 May 2012

Salmon & Philadelphia ISO maki

Sushi is another one of my favourite foods and I have it quite often. I do have to admit, that most of the times I just pop out to the nearest Yo Sushi and stuff myself with their sushi, instead of making my own. Knowing that I had all the required essential ingredients at home - just had to buy some salmon - I decided to treat myself to some home-made sushi before my big exam tomorrow.

Salmon is one of my favourite fish and also on of my favourite sushi fillings - the first sushi I tried was with salmon and the first sushi I made myself was with salmon. I have tried various combinations (salmon and avocado; salmon, cucumber and avocado; just salmon) and undoubtedly the salmon & Philadelphia combination is the winner. Also, last spring, while back in Estonia for a bit, I discovered this amazing wasabi and sesame spice mix by Santa Maria. It gives just enough spiciness and taste to sushi, whilst not being overpowering. I have yet not seen it in the UK and unless you're lucky enough to have someone bring it over for you, I would suggest using sesame seeds on the sushi and serving the wasabi on the side instead.


Ingredients
(Makes 1 roll - 6 slices)
- 1 sheet of nori
- 85g sushi rice
- 1 tsp Japanese rice vinegar
- Pinch of sugar
- 50g (smoked) salmon
- 40g cucumber, sliced into thin strips
- 35g Philadelphia
- Sesame seeds / Wasabi - sesame spice mix
- Soy sauce, to serve
- Pickled ginger, to serve
- Wasabi, to serve

Directions
Firstly, prepare the sushi rice. Rinse the rice and then place in a bowl, cover with cold water and let it stand for 20 minutes. Then place the rice in a pot, pour over 140ml water and bring to boil uncovered. When it starts to boil, turn down the heat and reduce it to simmer, cover and cook for around 10 minutes or until the water has been absorbed. Then remove from pot, place on a plate and cool to room temperature. When the rice is cool enough, mix a pinch of sugar with 1 tsp of Japanese rice vinegar and mix it into the rice.

Before making the sushi, make sure all the ingredients are ready - cucumber and salmon sliced into thin strips.

Firstly, place the nori, shiny side down, on the bamboo mat. Cover evenly with sushi rice - I use a wet plastic spatula, as then the rice doesn't stick to anything. Be careful not to tear the nori. Then sprinkle the rice with sesame seeds / wasabi and sesame spice mix. Take a piece of cling film and place it on the sushi rice, as then the rice won't get stuck to the bamboo mat when making the inside out (ISO) roll.

Turn the nori sheet around and place the ingredients - salmon, cucumber and Philadelphia - in the middle of the sheet and roll it up. Make sure that the roll is nicely tight. Use a very sharp and wet knife to cut the roll into 2-3 cm pieces. Place on a plate and serve with soy sauce, pickled ginger and wasabi. I served it with some grated cucumber as the wasabi was already in the sushi and I did not need pickled ginger to clear my palate.


11 May 2012

Herb & tomato cod

I am amazed by how much influence the weather has on my food decisions - the moment it turns warm and sunny I start craving a lot lighter meals. Today was one of those days and as it was Friday and I had some time in my hands, I decided to challenge myself - have white fish, cod, for dinner. I've never managed to hit the spot, so to speak, when preparing cod. It's always come out just okay. However, I can proudly say that this is not so anymore - I managed to make a delicious meal, which was really tasty and way better than just okay - it hit the spot! I served the cod with baby potatoes and sour cream dipping sauce, however it would go well with fresh salad, rice or quinoa. Light, easy and surprisingly filling -  couple it with a nice fresh white wine and you have a perfect easy dinner party dish for warm summer evenings.


Ingredients
(Serves 1)
- 120g Cod fillet
- 30g cherry tomatoes, halved
- 1/2 tsp rinsed and drained baby capers
- 1 fresh thyme spring
- 1 tsp white balsamic vinegar
- Drop of olive oil
- Freshly ground pepper

- 100g baby potatoes
- 40g sour cream
- Dried mixed herbs
- Pinch of salt

Directions
Place the potatoes in a saucepan and bring to boil. Then simmer until cooked (around 20 minutes).

For cod parcels, preheat the oven to 200C / 180C fan-forced.  Then cut out a 20cm baking paper or foil square and place the cod fillet in the middle of it. Place the tomatoes, capers, thyme, vinegar and olive oil over the fish. Gather the corners of the baking paper or foil above the fish and twist to enclose securely. Place the parcels on a tray and bake for 15 minutes. Let the fish stand for 5 minutes before serving.

For the sauce, mix sour cream together with dried mixed herbs and a pinch of salt.

Place the potatoes and fish on a plate (can leave it in the parcel), sprinkle over with some freshly ground pepper and serve. Serve the dipping sauce alongside the potatoes or spoon over them.

Recipe from AWW book "Low Fat Kitchen"